By Jody Dedmon
A beautiful floor starts with a stable subfloor. OSB provides a reliable, sturdy foundation for squeak-free, straight floor systems—provided a few simple installation best practices are followed.
Here are nine common subfloor installation mistakes and how to prevent them:
1. Improper spacing.
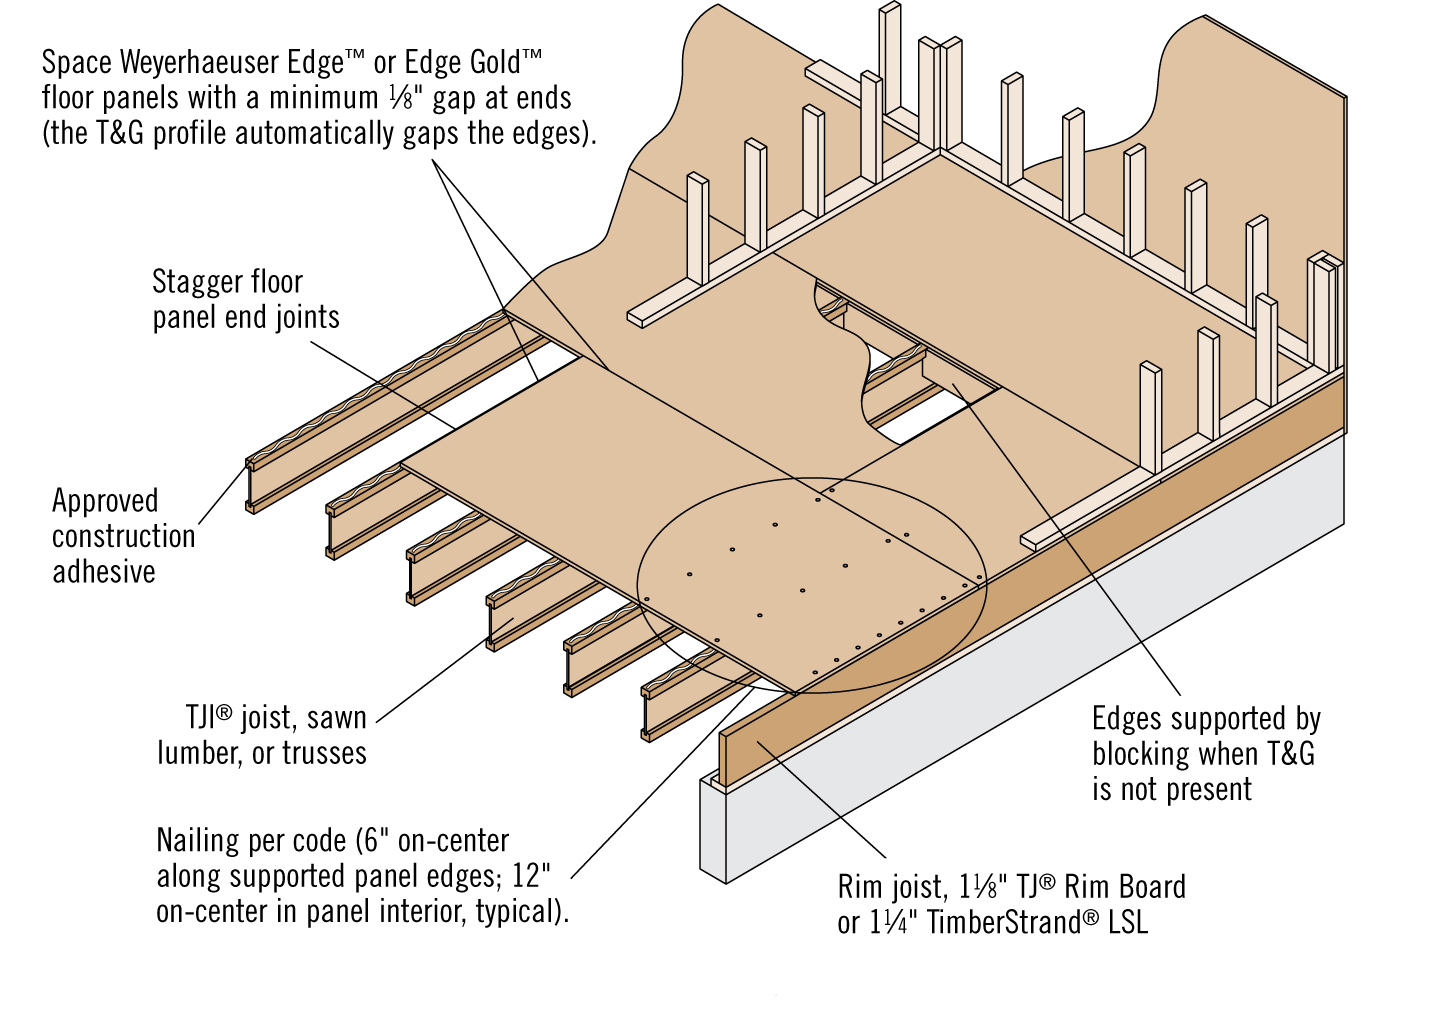
To avoid buckling, subfloor panels should be spaced with a 1/8-inch gap at all edges and ends to provide room for naturally occurring expansion. Tongue-and-groove edges on many premium floor panels, such as Weyerhaeuser’s Edge Gold® OSB panels, are designed to self-gap.
2. Using green joists.
Wet lumber may lead to dimensional changes as the joists dry, resulting in nail pops and floor squeaks. Use Trus Joist® TJI® joists or kiln-dried, performance-tested lumber, such as Weyerhaeuser Framer Series® lumber, which is more dimensionally stable than green lumber.
3. Not letting a subfloor dry.
Always store floor panels under cover. OSB exposed during construction must be allowed to dry (especially before installing sensitive finish materials such as hardwood flooring). Edge Gold includes patented Down Pore®grooves that help shed standing water and a proprietary edge seal to reduce edge swell.
4. Improper nailing.
To avoid nail pops, pullouts, and shiners (nails that barely hit the joist), all of which can cause squeaks, use the correct nail size and spacing, and ensure the nails penetrate the floor joists and sink fully. Generally, nails (6d ring or screw shank, or 8d common) should be spaced 6 inches on center along supported panel edges and 12 inches on center on the panels’ interior supports, or as specified on the construction drawings. Many manufacturers print a fastener template directly on the panel face. For panels thicker than 1 inch, 10d nails should be used.
5. Forgoing glue.
A glue-nailed construction technique is optimal for ensuring a flat, stable floor. Use a solvent-based glue that meets ASTM D3498 performance standards; in cases where latex subfloor glue is required, careful selection is necessary due to the wide range of performance between brands.
6. Improper glue application.
Apply glue per manufacturer’s specifications. Be sure the joists are dry and free of dirt before applying. Many manufacturers recommend applying a continuous ¼-inch-diameter glue bead to framing members and using a serpentine pattern for supports that are 3½ inches or wider. Apply two beads of glue to panel joint locations; a 1/8-inch glue bead applied at the tongue-and-groove joints can further improve floor performance.
7. Letting glue dry.
If the glue develops a skin, it will lose some of its strength or may not bond at all. Apply only enough glue for one or two panels at a time, and completely fasten each panel before the glue is set. Check manufacturer specs for setting times, and keep in mind that warm weather can accelerate those times.
8. Hammering edges.
Using a sledgehammer to force a tongue and groove joint together tightly can crush the wood fibers, damaging both the panel hit as well as the one it is forced into. Further, it can close up the necessary gap on panel edges, leading to improper spacing issues mentioned above. Some premium panels, such as Edge Gold, are designed to fit together easily. If additional force is needed, always use a block of wood against the groove edge to minimize damage to the panel, and always allow a 1/8-inch gap between panels.
9. Forgetting to check your work.
Prior to finished floor installation, walk the subfloor to check for squeaks, missing fasteners, improper nailing, etc.
Simple strategies such as these can help provide flooring systems that are sturdy, stable, and squeak-free. For more detailed instructions and for tips on how to repair squeaky floors, download “Prevention and Repair of Floor Squeaks” here.
Click image below to enlarge
JODY DEDMON

Jody Dedmon has spent more than 25 years with Weyerhaeuser, a majority of them within the OSB division. In his current role as Market Development Manager, Jody applies in-depth knowledge of OSB manufacturing, installation practices, and market trends; leads a team of OSB Market Development Representatives; conducts training throughout the channel; and lends his extensive expertise to new product development and implementation.